
webpack 性能优化
HMR (热模块替换)
HMR: hot module replacement 热模块替换 / 模块热替换
作用:一个模块发生变化,只会重新打包这一个模块(而不是打包所有模块)
极大提升构建速度
1、样式文件:可以使用HMR功能:因为style-loader内部实现了~
2、js文件:默认不能使用HMR功能 —> 需要修改js代码,添加支持HMR功能的代码
1
2
3
4
5
6
7
8
| if (module.hot) {
module.hot.accept('./print.js', function() {
});
}
|
注意:HMR功能对js的处理,只能处理非入口js文件的其他文件。
3、html文件: 默认不能使用HMR功能.同时会导致问题:html文件不能热更新了~ (不用做HMR功能)
解决:修改entry入口,将html文件引入
1
| entry: ['./src/js/index.js', './src/index.html']
|
修改配置文件
1
2
3
4
5
6
7
8
9
10
11
12
13
14
15
16
17
18
19
20
21
22
23
24
25
26
27
28
29
30
31
32
33
34
35
36
37
38
39
40
41
42
43
44
45
46
47
48
49
50
51
52
53
54
55
56
57
58
59
60
61
62
63
64
65
66
67
68
69
70
| const { resolve } = require('path');
const HtmlWebpackPlugin = require('html-webpack-plugin');
module.exports = {
entry: ['./src/js/index.js', './src/index.html'],
output: {
filename: 'js/built.js',
path: resolve(__dirname, 'build')
},
module: {
rules: [
{
test: /\.less$/,
use: ['style-loader', 'css-loader', 'less-loader']
},
{
test: /\.css$/,
use: ['style-loader', 'css-loader']
},
{
test: /\.(jpg|png|gif)$/,
loader: 'url-loader',
options: {
limit: 8 * 1024,
name: '[hash:10].[ext]',
esModule: false,
outputPath: 'imgs'
}
},
{
test: /\.html$/,
loader: 'html-loader'
},
{
exclude: /\.(html|js|css|less|jpg|png|gif)/,
loader: 'file-loader',
options: {
name: '[hash:10].[ext]',
outputPath: 'media'
}
}
]
},
plugins: [
new HtmlWebpackPlugin({
template: './src/index.html'
})
],
mode: 'development',
devServer: {
contentBase: resolve(__dirname, 'build'),
compress: true,
port: 3000,
open: true,
hot: true
}
};
|
在devServer中开启hot就可以。
source-map
source-map: 一种 提供源代码到构建后代码映射 技术 (如果构建后代码出错了,通过映射可以追踪源代码错误)
1
| [inline-|hidden-|eval-][nosources-][cheap-[module-]]source-map //devtool属性的值
|
source-map:外部
错误代码准确信息 和 源代码的错误位置
inline-source-map:内联
只生成一个内联source-map
错误代码准确信息 和 源代码的错误位置
hidden-source-map:外部
错误代码错误原因,但是没有错误位置
不能追踪源代码错误,只能提示到构建后代码的错误位置
eval-source-map:内联
每一个文件都生成对应的source-map,都在eval
错误代码准确信息 和 源代码的错误位置
nosources-source-map:外部
错误代码准确信息, 但是没有任何源代码信息
cheap-source-map:外部
错误代码准确信息 和 源代码的错误位置
只能精确的行
cheap-module-source-map:外部
错误代码准确信息 和 源代码的错误位置
module会将loader的source map加入
内联 和 外部的区别:1. 外部生成了文件,内联没有 2. 内联构建速度更快
开发环境:速度快,调试更友好
速度快(eval>inline>cheap>…)
eval-cheap-souce-map 速度最快
eval-source-map 速度其次,在开发环境中推荐使用,vue中的脚手架也是采用的eval-source-map
调试更友好
souce-map
cheap-module-souce-map
cheap-souce-map
eval-source-map / eval-cheap-module-souce-map
生产环境:源代码要不要隐藏? 调试要不要更友好
内联会让代码体积变大,所以在生产环境不用内联
nosources-source-map 全部隐藏
hidden-source-map 只隐藏源代码,会提示构建后代码错误信息
source-map / cheap-module-souce-map
修改配置:在module.exports中加入devtool属性即可
1
2
3
4
5
6
7
8
9
10
11
12
13
14
15
16
17
18
19
20
21
22
23
24
25
26
27
28
29
30
31
32
33
34
35
36
37
38
39
40
41
42
43
44
45
46
47
48
49
50
51
52
53
54
55
56
57
58
59
60
61
62
63
64
65
66
67
68
69
70
71
72
73
74
75
76
77
78
79
80
81
82
|
const { resolve } = require('path');
const HtmlWebpackPlugin = require('html-webpack-plugin');
module.exports = {
entry: ['./src/js/index.js', './src/index.html'],
output: {
filename: 'js/built.js',
path: resolve(__dirname, 'build')
},
module: {
rules: [
{
test: /\.less$/,
use: ['style-loader', 'css-loader', 'less-loader']
},
{
test: /\.css$/,
use: ['style-loader', 'css-loader']
},
{
test: /\.(jpg|png|gif)$/,
loader: 'url-loader',
options: {
limit: 8 * 1024,
name: '[hash:10].[ext]',
esModule: false,
outputPath: 'imgs'
}
},
{
test: /\.html$/,
loader: 'html-loader'
},
{
exclude: /\.(html|js|css|less|jpg|png|gif)/,
loader: 'file-loader',
options: {
name: '[hash:10].[ext]',
outputPath: 'media'
}
}
]
},
plugins: [
new HtmlWebpackPlugin({
template: './src/index.html',
minify: {
collapseWhitespace: true,
removeComments: true
}
})
],
mode: 'development',
devServer: {
contentBase: resolve(__dirname, 'build'),
compress: true,
port: 3000,
open: true,
hot: true
},
devtool: 'eval-source-map'
};
|
oneOf
配置完oneOf,它以下的loader只会匹配一个
注意:不能有两个配置处理同一种类型文件,如果有就将一个提取上去,放外面就好了。
修改配置文件
1
2
3
4
5
6
7
8
9
10
11
12
13
14
15
16
17
18
19
20
21
22
23
24
25
26
27
28
29
30
31
32
33
34
35
36
37
38
39
40
41
42
43
44
45
46
47
48
49
50
51
52
53
54
55
56
57
58
59
60
61
62
63
64
65
66
67
68
69
70
71
72
73
74
75
76
77
78
79
80
81
82
83
84
85
86
87
88
89
90
91
92
93
94
95
96
97
98
99
100
101
102
103
104
105
106
107
108
109
110
111
112
113
114
115
116
117
118
119
120
121
122
123
124
125
126
| const { resolve } = require('path');
const MiniCssExtractPlugin = require('mini-css-extract-plugin');
const OptimizeCssAssetsWebpackPlugin = require('optimize-css-assets-webpack-plugin');
const HtmlWebpackPlugin = require('html-webpack-plugin');
process.env.NODE_ENV = 'production';
const commonCssLoader = [
MiniCssExtractPlugin.loader,
'css-loader',
{
loader: 'postcss-loader',
options: {
ident: 'postcss',
plugins: () => [require('postcss-preset-env')()]
}
}
];
module.exports = {
entry: './src/js/index.js',
output: {
filename: 'js/built.js',
path: resolve(__dirname, 'build')
},
module: {
rules: [
{
test: /\.js$/,
exclude: /node_modules/,
enforce: 'pre',
loader: 'eslint-loader',
options: {
fix: true
}
},
{
oneOf: [
{
test: /\.css$/,
use: [...commonCssLoader]
},
{
test: /\.less$/,
use: [...commonCssLoader, 'less-loader']
},
{
test: /\.js$/,
exclude: /node_modules/,
loader: 'babel-loader',
options: {
presets: [
[
'@babel/preset-env',
{
useBuiltIns: 'usage',
corejs: {version: 3},
targets: {
chrome: '60',
firefox: '50'
}
}
]
]
}
},
{
test: /\.(jpg|png|gif)/,
loader: 'url-loader',
options: {
limit: 8 * 1024,
name: '[hash:10].[ext]',
outputPath: 'imgs',
esModule: false
}
},
{
test: /\.html$/,
loader: 'html-loader'
},
{
exclude: /\.(js|css|less|html|jpg|png|gif)/,
loader: 'file-loader',
options: {
outputPath: 'media'
}
}
]
}
]
},
plugins: [
new MiniCssExtractPlugin({
filename: 'css/built.css'
}),
new OptimizeCssAssetsWebpackPlugin(),
new HtmlWebpackPlugin({
template: './src/index.html',
minify: {
collapseWhitespace: true,
removeComments: true
}
})
],
mode: 'production'
};
|
缓存
主要针对生产环境的缓存
注意:有可能是面试题 注意。
1
2
3
4
5
6
7
8
9
10
11
12
13
14
15
| 缓存:
babel缓存
cacheDirectory: true
--> 让第二次打包构建速度更快
文件资源缓存 修改 filename: 'js/built.[contenthash:10].js'
hash: 每次wepack构建时会生成一个唯一的hash值。
问题: 因为js和css同时使用一个hash值。
如果重新打包,会导致所有缓存失效。(可能我却只改动一个文件)
chunkhash:根据chunk生成的hash值。如果打包来源于同一个chunk,那么hash值就一样
问题: js和css的hash值还是一样的
因为css是在js中被引入的,所以同属于一个chunk
contenthash: 根据文件的内容生成hash值。不同文件hash值一定不一样
--> 让代码上线运行缓存更好使用
|
设置配置文件:
1
2
3
4
5
6
7
8
9
10
11
12
13
14
15
16
17
18
19
20
21
22
23
24
25
26
27
28
29
30
31
32
33
34
35
36
37
38
39
40
41
42
43
44
45
46
47
48
49
50
51
52
53
54
55
56
57
58
59
60
61
62
63
64
65
66
67
68
69
70
71
72
73
74
75
76
77
78
79
80
81
82
83
84
85
86
87
88
89
90
91
92
93
94
95
96
97
98
99
100
101
102
103
104
105
106
107
108
109
110
111
112
113
114
115
116
117
118
119
120
121
122
123
124
125
126
127
128
129
| const { resolve } = require('path');
const MiniCssExtractPlugin = require('mini-css-extract-plugin');
const OptimizeCssAssetsWebpackPlugin = require('optimize-css-assets-webpack-plugin');
const HtmlWebpackPlugin = require('html-webpack-plugin');
process.env.NODE_ENV = 'production';
const commonCssLoader = [
MiniCssExtractPlugin.loader,
'css-loader',
{
loader: 'postcss-loader',
options: {
ident: 'postcss',
plugins: () => [require('postcss-preset-env')()]
}
}
];
module.exports = {
entry: './src/js/index.js',
output: {
filename: 'js/built.[contenthash:10].js',
path: resolve(__dirname, 'build')
},
module: {
rules: [{
test: /\.js$/,
exclude: /node_modules/,
enforce: 'pre',
loader: 'eslint-loader',
options: {
fix: true
}
},
{
oneOf: [{
test: /\.css$/,
use: [...commonCssLoader]
},
{
test: /\.less$/,
use: [...commonCssLoader, 'less-loader']
},
{
test: /\.js$/,
exclude: /node_modules/,
loader: 'babel-loader',
options: {
presets: [
[
'@babel/preset-env',
{
useBuiltIns: 'usage',
corejs: { version: 3 },
targets: {
chrome: '60',
firefox: '50'
}
}
]
],
cacheDirectory: true
}
},
{
test: /\.(jpg|png|gif)/,
loader: 'url-loader',
options: {
limit: 8 * 1024,
name: '[hash:10].[ext]',
outputPath: 'imgs',
esModule: false
}
},
{
test: /\.html$/,
loader: 'html-loader'
},
{
exclude: /\.(js|css|less|html|jpg|png|gif)/,
loader: 'file-loader',
options: {
outputPath: 'media'
}
}
]
}
]
},
plugins: [
new MiniCssExtractPlugin({
filename: 'css/built.[contenthash:10].css'
}),
new OptimizeCssAssetsWebpackPlugin(),
new HtmlWebpackPlugin({
template: './src/index.html',
minify: {
collapseWhitespace: true,
removeComments: true
}
})
],
mode: 'production',
devtool: 'source-map'
};
|
tree shaking
tree shaking:去除无用代码
前提:1. 必须使用ES6模块化 2. 开启production环境
作用: 减少代码体积
在package.json中配置
“sideEffects”: false 所有代码都没有副作用(都可以进行tree shaking)
问题:可能会把css / @babel/polyfill (副作用)文件干掉
“sideEffects”: [“.css”, “.less”]
1
| "sideEffects": ["*.css", "*.less"]
|
code split (代码分割)
将一个大的js代码块 分割成多个小的代码块,并行加载,总而加快速度。
有三种分割方式:
第一种
有两种配置
1、单入口 —-默认输出单个文件
2、多入口 —-有几个入口输出几个入口

修改配置文件
1
2
3
4
5
6
7
8
9
10
11
12
13
14
15
16
17
18
19
20
21
22
23
24
25
26
27
28
29
30
| const { resolve } = require('path');
const HtmlWebpackPlugin = require('html-webpack-plugin');
module.exports = {
entry: {
index: './src/js/index.js',
test: './src/js/test.js'
},
output: {
filename: 'js/[name].[contenthash:10].js',
path: resolve(__dirname, 'build')
},
plugins: [
new HtmlWebpackPlugin({
template: './src/index.html',
minify: {
collapseWhitespace: true,
removeComments: true
}
})
],
mode: 'production'
};
|
第二种
有两种配置
1、单入口 —-只将node_modules中代码封装打包
2、多入口 —-除了打包node_modules中代码,还会分析这些多入口有没有公共的依赖。如果有会打包成单独一个chunk
第二种分割代码不经常使用
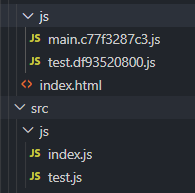
我们在index.js和test.js中都引入jquery。

修改配置文件
1
2
3
4
5
6
7
8
9
10
11
12
13
14
15
16
17
18
19
20
21
22
23
24
25
26
27
28
29
30
31
32
33
34
35
36
37
38
39
40
41
42
| const { resolve } = require('path');
const HtmlWebpackPlugin = require('html-webpack-plugin');
module.exports = {
entry: {
index: './src/js/index.js',
test: './src/js/test.js'
},
output: {
filename: 'js/[name].[contenthash:10].js',
path: resolve(__dirname, 'build')
},
plugins: [
new HtmlWebpackPlugin({
template: './src/index.html',
minify: {
collapseWhitespace: true,
removeComments: true
}
})
],
optimization: {
splitChunks: {
chunks: 'all'
}
},
mode: 'production'
};
|
第三种(常用)
1、我们一般采用单入口,配合optimization,将node_modules中代码单独打包一个chunk,
2、其次我们还希望其他的js文件可以单独打包成一个文件,这样我们就使用js代码来实现。如:在头入口index.js中这样写。
1
2
3
4
5
6
7
8
9
10
11
12
13
14
15
16
17
|
import('./test')
.then(() => {
console.log('文件加载成功~');
})
.catch(() => {
console.log('文件加载失败~');
});
|
修改 webpack.config.js 中的配置
1
2
3
4
5
6
7
8
9
10
11
12
13
14
15
16
17
18
19
20
21
22
23
24
25
26
27
28
29
30
31
32
33
34
35
36
37
38
| const { resolve } = require('path');
const HtmlWebpackPlugin = require('html-webpack-plugin');
module.exports = {
entry: './src/js/index.js',
output: {
filename: 'js/[name].[contenthash:10].js',
path: resolve(__dirname, 'build')
},
plugins: [
new HtmlWebpackPlugin({
template: './src/index.html',
minify: {
collapseWhitespace: true,
removeComments: true
}
})
],
optimization: {
splitChunks: {
chunks: 'all'
}
},
mode: 'production'
};
|

懒加载和预加载
懒加载~:当文件需要使用时才加载~,不是上来就加载而是触发某些条件才会加载的。利用代码分割的思路,将代码分割的语法import放到一个异步函数当中,等条件触发,再来加载懒加载这些代码。
预加载 prefetch:会在使用之前,提前加载js文件
正常加载可以认为是并行加载(同一时间加载多个文件)
预加载 prefetch:等其他资源加载完毕,浏览器空闲了,再偷偷加载资源。(缺点:兼容性差)
index.js
1
2
3
4
5
6
7
8
9
10
11
12
13
14
15
16
17
| console.log('index.js文件被加载了~');
document.getElementById('btn').onclick = function() {
import ( './test').then(({ mul }) => {
console.log(mul(4, 5));
});
};
|
test.js
1
2
3
4
5
6
7
8
9
10
| console.log('test.js文件被加载了~');
export function mul(x, y) {
return x * y;
}
export function count(x, y) {
return x - y;
}
|

同时利用前面的inport 进行代码分割,所以有两个js文件。

点击按钮之后才会加载test.js文件

pwd(离线可访问)
PWA: 渐进式网络开发应用程序(离线可访问)
workbox —> workbox-webpack-plugin
第一步:下载插件,引入插件
1
| cnpm i workbox-webpack-plugin -D
|
1
2
3
4
5
6
7
8
9
10
11
12
13
14
15
16
17
18
19
20
21
22
23
24
25
26
27
28
29
30
31
|
const WorkboxWebpackPlugin = require('workbox-webpack-plugin');
plugins: [
new MiniCssExtractPlugin({
filename: 'css/built.[contenthash:10].css'
}),
new OptimizeCssAssetsWebpackPlugin(),
new HtmlWebpackPlugin({
template: './src/index.html',
minify: {
collapseWhitespace: true,
removeComments: true
}
}),
new WorkboxWebpackPlugin.GenerateSW({
clientsClaim: true,
skipWaiting: true
})
]
|
第二步:在入口文件中注册serviceWorker
1
2
3
4
5
6
7
8
9
10
11
12
13
14
15
16
17
18
19
20
21
22
23
24
25
26
27
28
29
30
31
32
| import { mul } from './test';
import '../css/index.css';
function sum(...args) {
return args.reduce((p, c) => p + c, 0);
}
console.log(mul(2, 3));
console.log(sum(1, 2, 3, 4));
if ('serviceWorker' in navigator) {
window.addEventListener('load', () => {
navigator.serviceWorker
.register('/service-worker.js')
.then(() => {
console.log('sw注册成功了~');
})
.catch(() => {
console.log('sw注册失败了~');
});
});
}
|
第三步: 我们要注意一些事项
1
2
3
4
5
6
7
8
9
10
| 1. eslint不认识 window、navigator全局变量
解决:需要修改package.json中eslintConfig配置
"env": {
"browser": true // 支持浏览器端全局变量
}
2. sw代码必须运行在服务器上
--> nodejs
-->
npm i serve -g
serve -s build 启动服务器,将build目录下所有资源作为静态资源暴露出去
|
完整 webpack.config.js 中的配置:
1
2
3
4
5
6
7
8
9
10
11
12
13
14
15
16
17
18
19
20
21
22
23
24
25
26
27
28
29
30
31
32
33
34
35
36
37
38
39
40
41
42
43
44
45
46
47
48
49
50
51
52
53
54
55
56
57
58
59
60
61
62
63
64
65
66
67
68
69
70
71
72
73
74
75
76
77
78
79
80
81
82
83
84
85
86
87
88
89
90
91
92
93
94
95
96
97
98
99
100
101
102
103
104
105
106
107
108
109
110
111
112
113
114
115
116
117
118
119
120
121
122
123
124
125
126
127
128
129
130
131
132
133
134
135
136
137
| const { resolve } = require('path');
const MiniCssExtractPlugin = require('mini-css-extract-plugin');
const OptimizeCssAssetsWebpackPlugin = require('optimize-css-assets-webpack-plugin');
const HtmlWebpackPlugin = require('html-webpack-plugin');
const WorkboxWebpackPlugin = require('workbox-webpack-plugin');
process.env.NODE_ENV = 'production';
const commonCssLoader = [
MiniCssExtractPlugin.loader,
'css-loader',
{
loader: 'postcss-loader',
options: {
ident: 'postcss',
plugins: () => [require('postcss-preset-env')()]
}
}
];
module.exports = {
entry: './src/js/index.js',
output: {
filename: 'js/built.[contenthash:10].js',
path: resolve(__dirname, 'build')
},
module: {
rules: [
{
test: /\.js$/,
exclude: /node_modules/,
enforce: 'pre',
loader: 'eslint-loader',
options: {
fix: true
}
},
{
oneOf: [
{
test: /\.css$/,
use: [...commonCssLoader]
},
{
test: /\.less$/,
use: [...commonCssLoader, 'less-loader']
},
{
test: /\.js$/,
exclude: /node_modules/,
loader: 'babel-loader',
options: {
presets: [
[
'@babel/preset-env',
{
useBuiltIns: 'usage',
corejs: { version: 3 },
targets: {
chrome: '60',
firefox: '50'
}
}
]
],
cacheDirectory: true
}
},
{
test: /\.(jpg|png|gif)/,
loader: 'url-loader',
options: {
limit: 8 * 1024,
name: '[hash:10].[ext]',
outputPath: 'imgs',
esModule: false
}
},
{
test: /\.html$/,
loader: 'html-loader'
},
{
exclude: /\.(js|css|less|html|jpg|png|gif)/,
loader: 'file-loader',
options: {
outputPath: 'media'
}
}
]
}
]
},
plugins: [
new MiniCssExtractPlugin({
filename: 'css/built.[contenthash:10].css'
}),
new OptimizeCssAssetsWebpackPlugin(),
new HtmlWebpackPlugin({
template: './src/index.html',
minify: {
collapseWhitespace: true,
removeComments: true
}
}),
new WorkboxWebpackPlugin.GenerateSW({
clientsClaim: true,
skipWaiting: true
})
],
mode: 'production',
devtool: 'source-map'
};
|
多进程打包
我们一般给 babel-loader 来用 ,如果babel-loader处理的js文件大可以使用,如果较小,不推荐使用多进程打包。
1、下载安装包
1
| cnpm install thread-loader -D
|
2、修改配置文件
原配置文件:babel-loader
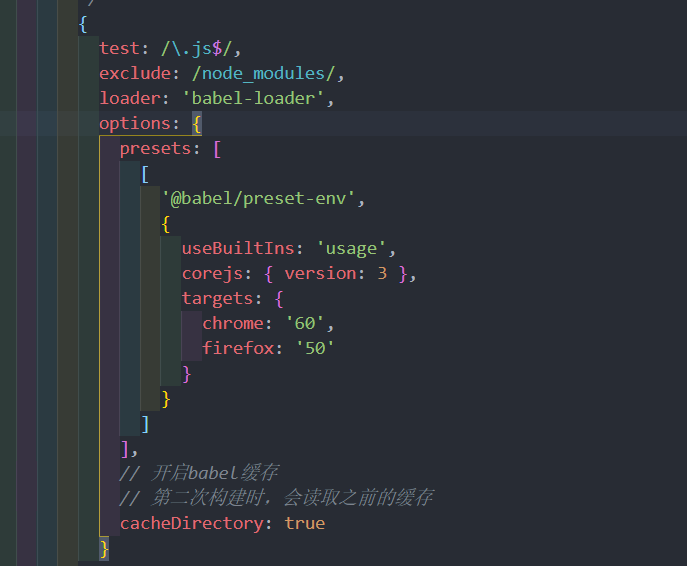
配置之后的文件
1
2
3
4
5
6
7
8
9
10
11
12
13
14
15
16
17
18
19
20
21
22
23
24
25
26
27
28
29
30
31
32
33
34
35
36
37
38
39
40
41
42
43
44
45
46
47
48
49
50
51
52
53
54
55
56
57
58
59
60
61
62
63
64
65
66
67
68
69
70
71
72
73
74
75
76
77
78
79
80
81
82
83
84
85
86
87
88
89
90
91
92
93
94
95
96
97
98
99
100
101
102
103
104
105
106
107
108
109
110
111
112
113
114
115
116
117
118
119
120
121
122
123
124
125
126
127
128
129
130
131
132
133
134
135
136
137
138
139
140
141
142
143
144
145
146
147
148
149
150
151
152
153
154
155
| const { resolve } = require('path');
const MiniCssExtractPlugin = require('mini-css-extract-plugin');
const OptimizeCssAssetsWebpackPlugin = require('optimize-css-assets-webpack-plugin');
const HtmlWebpackPlugin = require('html-webpack-plugin');
const WorkboxWebpackPlugin = require('workbox-webpack-plugin');
process.env.NODE_ENV = 'production';
const commonCssLoader = [
MiniCssExtractPlugin.loader,
'css-loader',
{
loader: 'postcss-loader',
options: {
ident: 'postcss',
plugins: () => [require('postcss-preset-env')()]
}
}
];
module.exports = {
entry: './src/js/index.js',
output: {
filename: 'js/built.[contenthash:10].js',
path: resolve(__dirname, 'build')
},
module: {
rules: [
{
test: /\.js$/,
exclude: /node_modules/,
enforce: 'pre',
loader: 'eslint-loader',
options: {
fix: true
}
},
{
oneOf: [
{
test: /\.css$/,
use: [...commonCssLoader]
},
{
test: /\.less$/,
use: [...commonCssLoader, 'less-loader']
},
{
test: /\.js$/,
exclude: /node_modules/,
use: [
{
loader: 'thread-loader',
options: {
workers: 2
}
},
{
loader: 'babel-loader',
options: {
presets: [
[
'@babel/preset-env',
{
useBuiltIns: 'usage',
corejs: { version: 3 },
targets: {
chrome: '60',
firefox: '50'
}
}
]
],
cacheDirectory: true
}
}
]
},
{
test: /\.(jpg|png|gif)/,
loader: 'url-loader',
options: {
limit: 8 * 1024,
name: '[hash:10].[ext]',
outputPath: 'imgs',
esModule: false
}
},
{
test: /\.html$/,
loader: 'html-loader'
},
{
exclude: /\.(js|css|less|html|jpg|png|gif)/,
loader: 'file-loader',
options: {
outputPath: 'media'
}
}
]
}
]
},
plugins: [
new MiniCssExtractPlugin({
filename: 'css/built.[contenthash:10].css'
}),
new OptimizeCssAssetsWebpackPlugin(),
new HtmlWebpackPlugin({
template: './src/index.html',
minify: {
collapseWhitespace: true,
removeComments: true
}
}),
new WorkboxWebpackPlugin.GenerateSW({
clientsClaim: true,
skipWaiting: true
})
],
mode: 'production',
devtool: 'source-map'
};
|
externals
彻底不打包,通过一些外链的cdn :jQuery,vue等等,用到时需用用cdn引入。
然后禁止一些包不会被打包到最后输出的 built.js 中,

修改配置文件:
1
2
3
4
5
6
7
8
9
10
11
12
13
14
15
16
17
18
19
20
21
22
23
| const { resolve } = require('path');
const HtmlWebpackPlugin = require('html-webpack-plugin');
module.exports = {
entry: './src/js/index.js',
output: {
filename: 'js/built.js',
path: resolve(__dirname, 'build')
},
plugins: [
new HtmlWebpackPlugin({
template: './src/index.html'
})
],
mode: 'production',
externals: {
jquery: 'jQuery'
}
};
|
dll
对第三方库进行打包,需要打包,打包一次,将来不用重复打包。所以使我们第二次打包的时候,变得很快,因为少了第三方库的打包。
第一步:创建 webpack.dll.js文件
1
2
3
4
5
| 使用dll技术,对某些库(第三方库:jquery、react、vue...)进行单独打包
当你运行 webpack 时,默认查找 webpack.config.js 配置文件
需求:需要运行 webpack.dll.js 文件
--> webpack --config webpack.dll.js
|
1
2
3
4
5
6
7
8
9
10
11
12
13
14
15
16
17
18
19
20
21
22
23
24
| const { resolve } = require('path');
const webpack = require('webpack');
module.exports = {
entry: {
jquery: ['jquery'],
},
output: {
filename: '[name].js',
path: resolve(__dirname, 'dll'),
library: '[name]_[hash]'
},
plugins: [
new webpack.DllPlugin({
name: '[name]_[hash]',
path: resolve(__dirname, 'dll/manifest.json')
})
],
mode: 'production'
};
|
运行命令
1
| webpack --config webpack.dll.js
|
生成dll文件夹
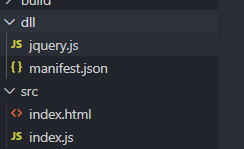
jquery.js是要打包的库是jquery,manifest.json 是 提供和jquery映射,这样以后jquery就不用重复打包了。
第二步:
下载一个插件
1
| cnpm i add-asset-html-webpack-plugin -D
|
告诉webpack哪些库不参与打包,同时使用时的名称也得变~
1
2
3
| new webpack.DllReferencePlugin({
manifest: resolve(__dirname, 'dll/manifest.json')
}),
|
将某个文件打包输出去,并在html中自动引入该资源
1
2
3
| new AddAssetHtmlWebpackPlugin({
filepath: resolve(__dirname, 'dll/jquery.js')
})
|
修改webpack.config.js 中的配置:
1
2
3
4
5
6
7
8
9
10
11
12
13
14
15
16
17
18
19
20
21
22
23
24
25
26
27
28
29
30
| const { resolve } = require('path');
const HtmlWebpackPlugin = require('html-webpack-plugin');
const webpack = require('webpack');
const AddAssetHtmlWebpackPlugin = require('add-asset-html-webpack-plugin');
module.exports = {
entry: './src/index.js',
output: {
filename: 'built.js',
path: resolve(__dirname, 'build')
},
plugins: [
new HtmlWebpackPlugin({
template: './src/index.html'
}),
new webpack.DllReferencePlugin({
      manifest: resolve(__dirname, 'dll/manifest.json')
    }),
new AddAssetHtmlWebpackPlugin({
      filepath: resolve(__dirname, 'dll/jquery.js')
    })
],
mode: 'production'
};
|
总结
webpack性能优化
开发环境性能优化
生产环境性能优化
- 优化打包构建速度
- oneOf
- babel缓存
- 多进程打包
- externals
- dll
- 优化代码运行的性能
- 缓存(hash-chunkhash-contenthash)
- tree shaking
- code split
- 懒加载/预加载
- pwa


.jpg)